Lost on Cow Island walkthrough

- 13 Comments
Walkthrough by Tessier/Ashpool
PART 1
The Beach
Get the Coloured Pencils. Go to lower left of screen: you are now in the Statue Beach. You try but can’t push the switch yet. Go back left to Beach, then left again to the cave, you’ll meet Dr Braun. Talk for a bit. Go to Cave Flower on right near water.; cut it free with a Knife; use Knife on Cave Flower after it’s in your inventory; this will give you Cave Flower Sap. Use it on the Quicksand; it will harden it, allowing you to walk across. Pick up the Stick. Walk right to…
The Farmer
This room consists of a large cow-person (“the Farmer”), and immediately to the right of this area, a broader picture showing the Farmer, a Tree, and a pathway in the middle leading up to the peak of the mountains behind.
You can click on the smaller Farmer to the left of the screen, and enter the larger detail of his room, to interact with him (give him objects, TALK, etc.)
Enter the farmer’s room, and TALK to him.
The Farmer (large cow-person) has a Whip, a Candle, and a ‘Thingemy bob something or other’ (a cubic zirconia and stainless steel crown covered in muck).
He doesn’t let you touch any of these objects.
Go through the farmer’s entire conversation tree, including the bit about his horse, called ‘Sugarlumps’.
The Horse of Fury
Exit to the far-right, to The Crossroads. Take the path going up/North, and go to the North Village, and finally to the Trailer, and TALK to the Horse of Fury inside.
Then GET from the trailer: The 19th century Clothes on the bed, a Keyring behind the grandfather clock-face, a Pipe on the floor, and the Hand Cream on the bench to the left.
Ask Horse of Fury (HoF) about ‘Sugarlumps’, the farmer’s horse.
Go back to the Farmer, and tell the farmer that his horse ‘Sugarlumps’ has escaped. The Farmer runs off, calling her name. Now get all three items: the Whip, the ’Thingemy bob/crown’, and the Candle.
Return to the North Village Trailer, and TALK again with Horse of Fury (HoF).
HoF needs you to help him solve 3 mysteries: ‘the mystery of the ghost train’, ‘the mystery of roughin’ up roger’, and the ‘mystery of cow island’.
Listen to HoF’s description of the three mysteries, then solve them:
Solve the ‘Mystery of the Ghost Train’
Examine the Teapot on the stove to the right of the horse. USE the on/off switch on the stove (the leftmost purple button). The pot heats up, and steam comes out of it. TALK to HoF again, pointing out that it was the kettle on the stove, and when he boils his tea in the morning, it whistles and screams while he’s in the shower, like a train whistle.
Solve the ‘Mystery of Ruffin’ Up Roger’
Go outside HoF’s trailer, to the right. You are in the Northern Village. Go to the Cowboy/Trainer on the left of the room, and talk to him about his mask - he says he needs to get a Whip and Mace to keep the ‘horses in line’; you already have the Whip, so now it’s time to get the Mace.
Exit to the bottom. When you’re back at the Crossroads, go towards the right, and exit through the right-hand/’Eastern’ path. You will see a large shop called Dark Seeds; continue along the path past the trees. Now you’re in the East Village, featuring a large mansion at the top of the hill, and a shop called ‘The Assayers’ to the right.
Use the Ring of Keys from HoF’s trailer to get through the locked gate to the mansion on the hill.
Collect the Green Key from the Mansion Entrance (ground floor), beneath the doormat.
Go upstairs.
Enter the door on the left – this is the Mansion Study. Use the Candle and Matches together.
When you ‘light’ the candle this way, it reveals ‘hidden things’ around the room, such as: a Gold Ingot in a safe to the right, and a Silver Pen on the desk to the left.
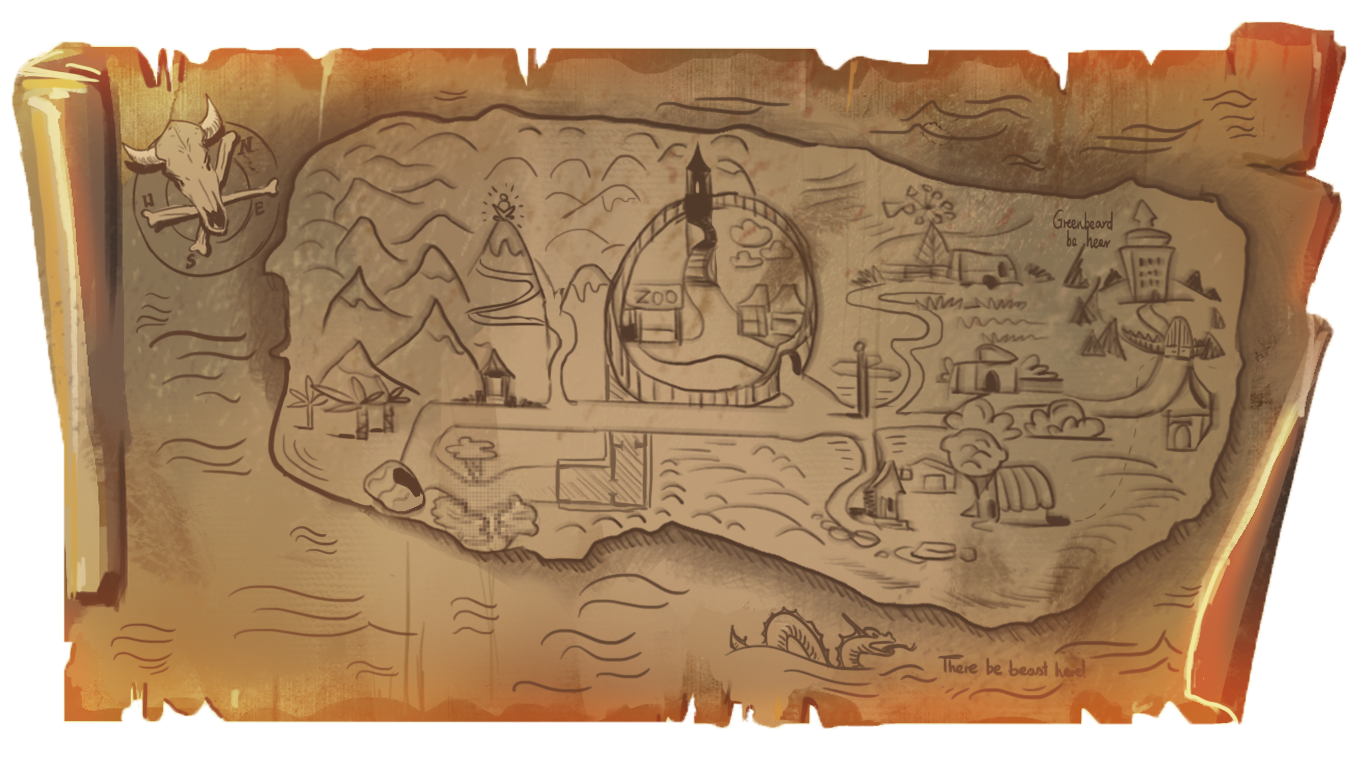
You will also get a Spyglass from the desk; use the Knife on it. When you use the Knife on the Spyglass, you get a Fisheye Lens, and a Map of the Island.
After finding the map, click the icon that appears at the top of the screen, and it will show you where you are on the island. Click it again to continue.
Go out of the study, and go to the door on the right, and enter the Mansion Kitchen.
Get the Dishwasher Fluid spilt over on the floor near the centre of the room. Also use matches+candle once again to find: the Silver Scissors on the centre of the counter; and a large, white, poorly scrawled message at the centre of the room - just above the mouse hole - which says: SMALLSIZE. Remember this.
There is also an 18th century recipe on the left end of the counter; it reads:
Cup of cut sawsyge=Italian sausage
Preserved fillet pork = salami
Three pot balls=meat balls
English lettuce=iceberg lettuce
New world lettuce=arugula lettuce/rocket lettuce
Pickled anchovies=anchovies
Cayenne vinagret=chilli sauce (ie.cayenne pepper sauce)=’zesty’ sauce
Curd of emmen[taler]=emmental cheese=’swiss’ cheese
These are the ingredients for a sandwich for a SMALLSIZE Slacklusters.
Salami
Meatballs
Anchovies
Lettuce iceberg
Lettuce arugula/rocket
Swiss cheese
Italian sausage
Zesty sauce
Eggplant (not used with more current versions of LoCI)
What does a smallsize sandwich do if you eat it? Find out :D
There are some Matches on the counter, on the far-right.
Wash the Thingemy bob/dirty crown with the Dishwasher Fluid: the Thingemy bob now turns into a Cubic Zirconia Crown (all cleaned up). Exit the kitchen to the left.
Go downstairs, walk out of the mansion, and find yourself at the bottom of the pathway to the mansion, just outside the metal gates. Go to the Assayers. Talk with him about various subjects. Trade the Cubic Zirconia Crown and the Gold Ingot to the Assayer character (i.e, USE both these items on him sequentially); he will give you the Mace from his shop (the one underneath the glass) in return.
Exit the Assayers, the Eastern Village, and the area outside Dark Seeds; then go back to the crossroads, and travel up/north to the Northern Village. Give the Mace to the cowboy; he complains about whipping horses, and leaves, leaving behind his Mask and the Mace Handle. Get the mace handle, then LOOK at it for the Unicorn Blood item.
Solve the ‘Mystery of Cow Island’
Exit the Northern Village to the bottom; on the crossroads, travel the second path down, on the right; this takes you back to the Farmer Cow. Go up the centre path to the Mountain Top. This room features a large cave, with falling snow outside it, and a ‘Buddhist Cow’ to the right-hand side of the screen. You can try walking further to the right, but when you do so, you will be told by Julius that he’s ‘walked far enough’.
Questioning the Buddhist Cow, you come to the Peace Pipe (i.e, the brown pipe from HoF’s trailer), which he accepts. To repay you for the Peace Pipe, the Buddhist Cow gives you a Relaxation CD (though you don’t have a CD player yet). He tediously explaining the history of the island to you (apropos of nothing), and fills you in on the Mystery of Cow Island, thus it’s solved. He gives you back the peace pipe/brown pipe from HoF’s trailer.
Exit to the left; travel down the mountain path to the Farmer, and exit to the right; At the crossroads, take the centre/northern path up, and find yourself in the North Village; enter HoF’s trailer.
All 3 mysteries are now solved. Talk to HoF, go through each mystery.
After solving all of them, you can give the Unicorn Blood to HoF, who immediately recognises it as the assayer’s grandfather’s ‘special brew’. He drinks it, immediately falls unconscious, and goes into a deep sleep.
He can’t be woken for the rest of the game, but you keep about 2/3rds of the Unicorn Blood in your inventory. It will be useful later on.
Now reach into HoF’s pants pocket and get the Red Key. Use it to open the draws by the bed, and get the Compass inside. LOOK at the compass, using candle+matches, and you’ll find one gold coin.
Exit the trailer, go back to the Eastern Village, then enter Dark Seeds.
This room features: a dark-haired ‘goth girl’ behind a desk at the centre, and a huge Venus Flytrap at the right end.
Use the Dish Washing Fluid (from the Mansion Kitchen) on the Flytrap, and he will cough up another Wooden Coin.
TALK to the ’goth girl’ (Rachael) about various topics. Eventually, you get to: ‘I’d like to buy some seeds’ – but Rachael needs some small change for this, so exit left on Dark Seeds; exit left again to the Crossroads, and go south/down to reach the Southern Village.
This room features: a bakery (“Mama Joan’s Bakery, Cakery, and Offal Shop”) on the left; a junk/bric-a-brac shop (“Den of Antiquity”) at the centre; a diner/café (“Slackluster’s”) to the right; and also a path off-screen to the bottom right. It also has a large tree to the right-centre.
Get the Uncut Paper-Bark off this tree. Use the Silver Scissors on the bark to make it a nice, square shape.
Go to the Bakery and talk to Mama Joan, and go through the whole conversation with her. Now take the Pig’s Head from the left, near the door.
Go to Slacklusters; get a Half-Eaten Croissant off the floor to the left of the counter. Also get the Blue Cup.
Talk to the Robot Waiter and order a sandwich with any fillings you like. Also get a Can of Cola and a Bottle of Water from the Robot Waiter’s extra items menu. Eat the sandwich, and find some paper inside it (shred #1).
Exit Slackluster’s to the right; then once outside, take the lower-right path on the right-hand side. You’ll discover yourself in a room behind Slacklusters, featuring a recycling bin/dumpster, a large blue metal door, and a mouse-sized Tiny Green Door in the tree trunk on the right. You’ll find a Spilt Bucket O’ Prawns and a Piece of Paper (shred #3) in the dumpster. Go back out the front of Slacklusters and exit left to the Den of Antiquity; get the Screwdriver off the desk by the door.
Go back inside Slacklusters; use the Screwdriver on the robot (when he is nearby, facing away from you). You will be presented with the internals of the robot with the backplate removed. Use the Fish Eye Lens to make things bigger. Pick out a Piece of Paper clogging up the screws (shred #2). Exit by pressing the ‘START’ button.
With the cog-jamming paper now removed, the waiter works properly again, and has a French accent.
All 3 shreds are now combined into one piece of paper, and you see a
3-letter code on it, but it’s not possible to decode it yet.
Go back to Mama Joan’s, and TALK to her. You will receive most of a sandwich recipe --Salami, Meatballs, Anchovies, 2 x Lettuce (iceberg and arugula), Swiss cheese, Italian sausage, Zesty sauce, and roasted Eggplant – ‘SMALLSIZE’.
Now return to Slacklusters and order the SMALLSIZE Sandwich from the robot, and use it on yourself (i.e, Julius); you become very small (for about 90 seconds). Exit right, follow the path on the lower right, go out the back to the dumpster room, and use the Green Key on the Tiny Green Door to open it and go inside.
(if you become big again too soon, get the robot to make you another sandwich, and move close to the target before you use it)
You find yourself in a tiny room, with a huge piece of cheese and spool of blue thread to the right of it; a large mouse wheel to the left, and a Cog to the lower-right. Get the Cog.
NOTE: After getting this Cog, you'll never be able to become small again, even with the special ingredients.
Exit the room through the large archway at its centre; you’ll end up in the kitchen of the Mansion once again, and suddenly you are normal size; walk out of the Mansion, and travel back towards the Southern Village...
On the way, go to Dark Seeds in the Eastern Village, and feed the Plant the Half-Eaten Croissant. He spits out the Blue Key, which you need to pick up off the ground.
Go back to South Village, go to Slacklusters out the back, and use the Blue Key to open the locked, blue door. This leads to Slackluster’s Kitchen. You’ll find a fridge and microwave to the left, and a bin to the centre. Get a Bag of Nickels from the bin, a Wooden Spoon from the high tool attachment to the upper-centre, and the Kitchen Bucket of Prawns in the microwave.
Exit right; go out of the dumpster room exiting left, and now go to the Den of Antiquity. Throw the Water on the Graphics Card (to the lower-left near the old computer); the DoA Clerk is annoyed, and no longer wants it, so he gives it to you for free. NOTE: This circuit board/card is one of the items you need to fix the car – the associated icon at the top left of the screen now lights up.
Also get the Keyboard from lower-centre of room, and the (green skirted) bobblehead from high on a shelf.
Also get the Fossilised Chewing Gum from under the back of the Arcade Machine.
Use the arcade game, once power is plugged in. You need 2 nickels to play it. These are in the Bag of Nickels from Slackluster’s Kitchen.
Try the arcade game – play till level 5or 6 and collect a wooden coin in the game. After you finish, a Wood Coin falls out of the coin slot in real life.
NOTE: The ‘gold’ pen in your inventory turns silver when you shine the candle-light on it; and also the wooden coins appear gold.
Now exit to the left; then continue left to the crossroads; and then to the Western Village path to the upper left.
Western Village
You find yourself on a large downward sloping path; in front of you are two anthropomorphic cow Guards; behind them a fairly large castle gate, which is closed at the moment.
TALK to the Guards; discuss various topics. In order to let you in the castle gate, they first require you to have a signed royal order with silver florets.
Exit to the right after exhausting your conversation tree with the guards; go down-left at the Crossroads, to get back to the Farmer and mountains location, then up the centre path to the Buddhist Cow again.
TALK to the Cow about the ‘seal of the western village’. If you’ve exhausted the whole conversation tree with the Buddhist, he will now say ‘the lesson is over for today’, and disappear into the background, leaving behind a broken Wax Seal which he’d previously ‘misplaced’ because he was sitting on it the entire time.
Use your hand cream on the seal – is it now whole.
Combine the Whole Seal with the Cut Paperbark to make a semi-complete Royal Seal.
Now use the Matches with the Candle, to shine the candlelight on your Gold Pen and turn it into a Silver Pen.
USE the Silver Pen to colour the Royal Seal, to give to the Guards.
NOTE: you may need to re-light the candle when giving the Royal Seal to the guards. Otherwise, the seal will appear golden, and so it won’t show as having ‘silver florets’.
Return to the Western Village, and try giving the royal seal to the Guards. However, you’re also told to give them:
1. 3x gold/wooden coins (one from HoF’s compass; one from the coin slot in the Arcade Game machine in DoA; and one from the stomach of the Venus Flytrap) as bribery to the guards:
NOTE: you will also have to combine matches+candle at the moment you pass the coins to the Guards, so that candelight can be shone on them, and the guards see them as gold-tinted)
2. The Pig’s Head, for grease to make the paper shiny.
Finally, they request your bag, and thus confiscate all your things. Your entire inventory is now gone !
The Pig’s Head is given back to you by the guards as a parting ‘gift’.
You are now let into the Western Village, and you disappear to the left.
PART 2
You are now trapped in the Western Village.
This room features: a Large Castle, in the distance at centre of screen; a ‘Zooquarium’ to the left; and the ‘Hunk o’ Junk’ tent and the Meat Market to the right.
Go to the Zooquarium, where you will find a pearl (under a disused fish tank, to the down-left of the room).
From Hunk O’ Junk you collect a Cracked Battery, and a Hand Mirror (from Horse of Fury’s lost mystery-solving-puzzle prize), a Rotten Lemon, and a Blank Note Book. Talk to the Dog in the Hunk O’ Junk.
Now exit to the left, and then travel upwards at centre screen to take the long stairway to the castle. You enter a large, long room which is the King’s amphitheatre; it has the King at the centre, the Kingsguard at the far-right, and a group of red velvet ropes blocking the way to an archway to the right.
Go beyond the red velvet ropes on the right side of this area to activate the Kingsguard discussing it with you, revealing that there’s an Animal Party (aka ‘the Garden Party’) going on in there. Now go to the King, and ask him to let you in to the Animal/Garden party. Once the King lets you in, the red rope across the right exit to the gardens disappears, and you can now enter the Garden Party.
This room is setup for a large outside celebration, complete with a table layered with cakes and drinks, and a croquet game to the right. The guests are all a group of intelligent animals: a pig, a deer, a hare, a crow, a fox, and a peacock.
Ask the Fox for the Gold Earrings (though at this point, they are bronze coloured and cheap ) in exchange for the Pig's Head.
To have satisfied guests and make it a good party, give them all they want:
1. Mr Finnius McPig won’t talk to you until you (i.e, Julius) convince him that you’re a pig. USE the Mirror from Hunk O’ Junk to give this impression (i.e, it reflects his own face back to him).
2. The Pig gets the Pearl you have, then gives you an Apple.
3. Give the Apple to the Crow – he will refuse it: he needs something a bit smaller. Cut it up with the Cake Knife (you’ll find it on the table to the left). Then he will give you a Brooch-Trinket-Thing in return.
4. Give the Brooch-Trinket Thing to Ms Peacock, and she gives you a Glass of Champaign.
5. Give the Small Fluffy Hare the Champaign; he’ll say he needs something a bit dryer. Try adding the Cracked Battery to the mixture; you’ll get (really, really) Dry Champaign (i.e, battery acid). The Hare gives you a Gaudy Colourful Handkerchief.
6. Use the Gaudy Colourful Handkerchief to clean and change the Bronze Earrings you got from the Fox, into Gold Earrings.
7. Exit the room to the left; exit the king’s amphitheatre again to the left; walk down the castle stairs, and into the Hunk O’ Junk. Finally:
Give the Gaudy Colourful Handkerchief to the Dog. He only sees things in black and white, so he thinks the pattern looks great, and gives you some Gloves.
Return to the Animal Party; give the Deer the Gloves.
She thinks they are splendid, and will keep them for her husband to put on his antlers.
She keeps complaining of something below her shoulder that’s painful; it is Metal Buckshot – you need to talk to the Fox to get it out.
He asks for a Gold Coin, which you don’t have, because they’ve all been confiscated by the guards. Exit the castle once again, travel down the castle stairs, and go to the right of Hunk O’ Junk, to the ‘Meat Market’ Butchery.
Talk to the Butcher, and eventually ask for the Clock on the wall
Give the Butcher the Gold Earrings for it; he gladly exchanges. Take the Clock (or ‘first prize in animal excellence’) to the King, and he gives you your bag back.
You now have your inventory back, as well as a few other objects thrown in by mistake: a blank Restaurant Health Card, and the Flow Inductor (for the car, item #2 – although it’s now broken)
Go back to the Fox, pay him your matches+candle-lit gold coins , and receive the Buckshot from the Deer’s shoulder in return. You also receive some Fuzzy Dice (car item #10); the Fox then disappears (literally, like a filthy Cheshire cat).
Exit the animal party and castle. Use the Gold Pen on the Health Card to draw an ‘F’ on it.
Enter the Zooquarium again. On the wall to the upper right, there’s a large square box featuring 3 wires coming out of it in cardinal directions; this is the Switchbox. USE it to enter into a closeup detail of the Switchbox.
There is a hole at its centre for the Buckshot, and 3 wires (red, green and blue), which you can disconnect or reconnect (i.e, click on a wire with the USE icon).
You need the Buckshot in the hole, or none of the changes you make to the wiring is reflected.
Close the Switchbox by USEing the left-pointing arrow on the left of the box.
You can change the time-of-day (with Buckshot now installed) which adjusts the light in the animal enclosure (a room further into the Zooquarium). Three wires connected is early morning; two wires is daytime; one or no wires is night.
At the corridor at the end of the current room, there’s another room containing a Sloth and a Snake; and further in again (following upwards in the corridor) are most of the animals (Giraffe, Ape, and Tiger).
When you enter the Zooquarium Room #3 (the Animal Cages room, featuring the Giraffe, Ape and Tiger), all animals are asleep, and it is night; this is due to the Buckshot not being in the hole of the Switchbox in Zooquarium Room #1 (aka fish tanks).
In Zooquarium Room #2 (Sloth/Snake) the sloth is always awake.
TALK to the Sloth; he describes the Switchbox.
The settings for the Switchbox (i.e, for Green, Blue and Red wires) are:
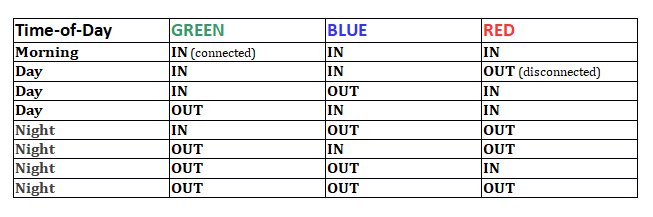
Please note that, in reality:
Sloths are awake during the morning, day, and night;
Apes are awake during the day;
Giraffes are awake morning and night;
Tigers are awake in the early hours of the morning, but only for a small amount of hunting time, 12am - 4am.
And so:
All times means the Sloth is awake.
Nighttime means the Giraffe is awake; Tiger and Ape are asleep.
Daytime means the Ape is awake; Giraffe and Tiger are asleep.
Early Morning means the Tiger and Giraffe are awake; the Ape is asleep.
Observe the map (map icon, upper-centre of screen):
Return to Zooquarium Room #1 (fish tanks).
Put the Buckshot in the hole in the centre of the Switchbox. Leave all wires OUT.
Enter Zooquarium Room #3 (animal cages), and TALK to the Giraffe. She reveals the Smokey Mountains (check map).
Return to Zooquarium Room #1, go to the Switchbox, and change the setting to Day.
Return to Zooquarium Room #3 (animal cages), and TALK to the Ape.
He has a thorn stuck in his foot, making him confused and angry. USE the Unicorn Blood on him; he drinks it, and falls unconscious; you (Julius) remove the thorn. When he comes to, he seems happy and laid-back. TALK to him now; he will reveal the location of the Pirate Bay (Give him the Coloured Pencils from the Beach to draw on the map).
Return to the Switchbox; set to Morning setting (this way, the Tiger will now be awake). Return to Zooquarium Room #3 (animal cages).
1. TALK to the Tiger; he mentions quite a few times that he’s partial to Red Meat.
2. Go back to the Meat Market butchery. Threaten the Butcher with the ‘F’ Healthcare Card, and get the Meat in return.
3. Go back to Zooquarium Room #3; feed the Red Meat to the Tiger; this will cause him to go insane with power and testosterone. He power-jumps through the wall behind his cage, leaving a huge hole.
Now talk to the Giraffe; she reveals the place of the Smokey Mountains Village, just near the right-hand side of the Buddhist’s Cave.
Go through the hole that the Tiger created. You find yourself in the Statue Beach, at the path toward right-hand end (so that’s where it goes!). You are now free of the King’s sanctioned holding in the Western Village, and you can come and go as you please.
In the Statue Beach, bury the Broken Lightbulb in the Fertile Soil, and notice that there’s now an electric spark on the wire leading to the Switch. Turn the lever to the left (future time), and the broken bulb will now be a Repaired Bulb. Flip the switch back to right (present time) and continue to the left of the screen, and enter the Beach.
You can find the Pirate Bay, but you don’t know how to reach it. You will first need to find the Smokey Mountains Village, and get supplies from there to build a Watercraft (i.e, a hastily built raft-y thing).
To get to the Smokey Mountains Village from the Beach, go to the right-hand side over the quicksand; go to the Farmer Cow, then continue to right; Walk up the centre path to the Buddhist Cow’s mountain cave, then walk to the right again – and this time, the path isn’t closed, and Julius now knows how to get to the Smokey Mountains village.
To build the Watercraft, you must get the large Weathervane off the roof of the Library. Look at the Art Notepad; this causes Julius to see it has pages missing from time-travel damage, and so screws up the notepad into a ball. Use the Screwed Up Paper Ball to get down the weathervane; peg it at the weathervane and watch it fall – must be the bird-poo destabilizing the struts, oh well.
Go to the Smokey Mountains Library. Go in and collect the Large Blue Chair. Also collect the Old Book on the table next to the computer, and the Face Plate down below the desk.
Return to Statue Beach; pull the Wooden Switch to the right, activating time-travel far into the future (this time, the wooden switch is no longer ‘stuck’, because now the apparent time-travel device created partially out of the Switchbox has active electricity running through it).
Go back to the Beach, find that it’s changed, and flung into the far, far future. The water is a different colour; the cave is now partially disintegrated; and upon entering the Cave to the left, the water-bed is all dried up, and it’s silty bottom is now all dried and revealed. There is an odd Dr-Braun-shaped skeleton nearby.
Get the Old Balloon and Flask from the dry river-bed.
Return to the Statue Beach, pull the Wooden Lever to the left, and return to the Beach which is now in the present time.
Check your inventory – your Balloon is now new and fixed. Add the Balloon to the base of the Blue Chair.
Combine the Weathervane with the Chair + Balloon – now you have a Working Watercraft. The Wooden Spoon will be used as a paddle.
PART 3
Get the Watercraft and put it in the ocean (to the lower part of screen), and travel to the Pirate Bay in it. On arrival, Julius scuttles the Watercraft and lets it sink, as well as the Spoon. You’re stuck there until you find a way back.
You are now in the monolith room of the Pirate Bay. Choose the Monolith and you will be greeted with a detailed picture of it.
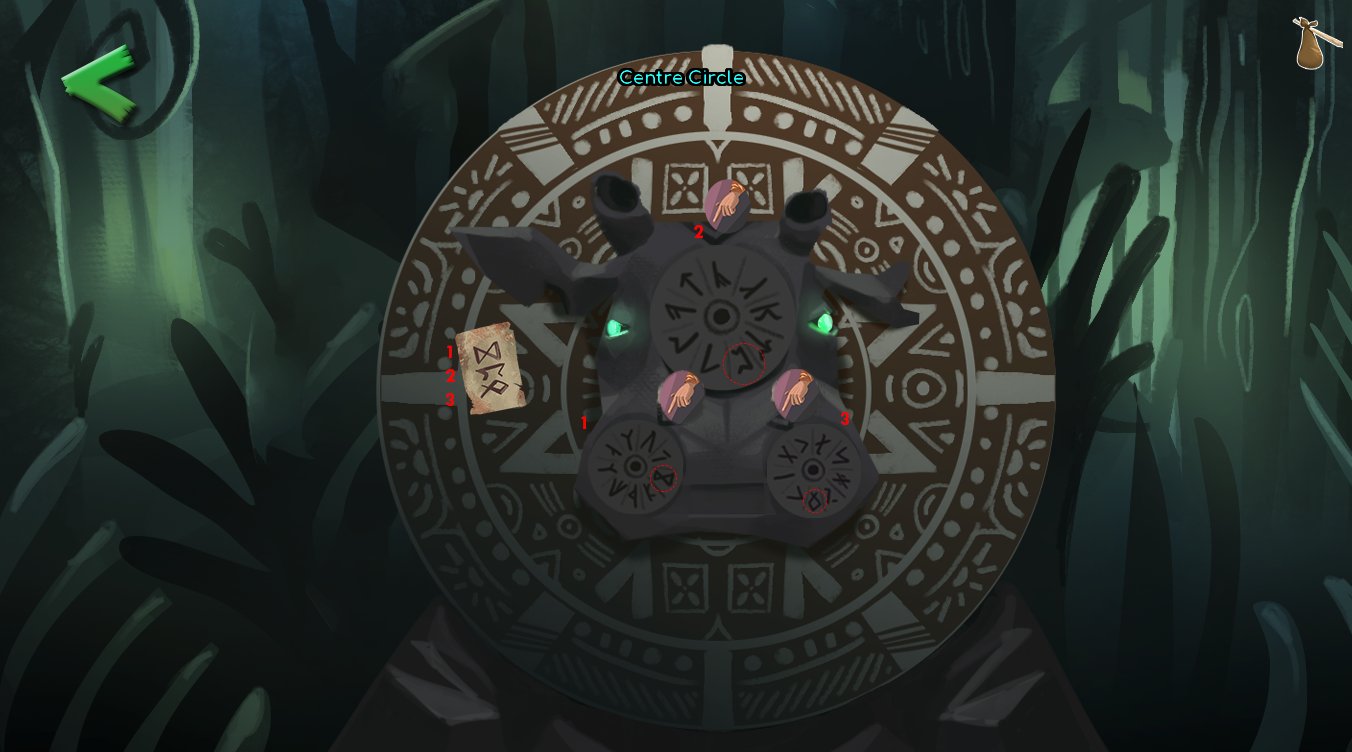
Put the Stick (from the Beach) and the Thorn (from the Ape’s foot in the Western Village Zoo), into the two holes at the top of the Monolith.
USE the Runes Sheet (top characters down) to solve the small code (going left-to-right) by using the USE cursor on each of the 3 little triangles.
Once you have done this, the ‘mouth’ will open - feed the Monolith paper into the mouth (i.e, USE the Runes Paper on the Mouth). The mouth closes and the Monolith descends with a grinding sound, revealing a cave opening.
Go inside, and find an Alien. Talk to him for a while, and then have him fix the Flow Inductor to working condition.
Look in your inventory, and notice your Fixed Lightbulb is now Glowing Blue. The title on your apparently blank notebook now says Jack’s Recipes.
Go out of the cave, and then go to the next room to the left, the Pirate Bay Dunking Tank, where you’ll find three pirates jeering at the victim. Talk to the Pirates for an introduction to the island. They exit left.
Press the target button on the right of the tank; it doesn’t budge. Exit left to the Docks Room, and pick up the Oil Can , then return to the right, and USE Oil on the Target; Now USE the Target again. The dunk victim is released, and ‘dunked’ (though it’s into a dry tub). Walk up into the tank via the ladder centre-screen; find the dunking victim out cold on the ground. Pick up the nearby Gold Tooth and Cool Hat in the tank, then exit left, and left again to the Docks Room, and finally go inside the tavern ‘The Ancient Mariner’.
TALK to the 3 pirates inside, and say that you want to become one of them.
You’ll have to get through the Three Trials of Piratedom first: the Clothing Trial, the Language Trial, and the Drinking Trial. They will go through them one by one:
Pirate Clothing Trial
You need 17th century clothes. Most of these are already in your inventory:
1. The 19th century clothing from HoF’s trailer has mysteriously turned into a 17th century black jacket, cummerbund, and pants.
2. The 19th century brown pipe/’peace pipe’ from HoF’s trailer has turned into a Corn Cob Pipe.
3. You already have the Cool Hat from the dunking tank.
You can only put on all these clothes (and actually see them) by changing your clothes on the Pirate Bay island. Change now, by taking the items from the inventory, and USEing them on Julius.
Get Old Jack to approve – the clothing trial is done.
Pirate Language Trial
TALK to all the pirates in the Tavern, and gradually get a feel for the language used by the pirates. After six terms are listened to (fix him to the sea; three sheets; black jack; cracking Jenny’s teacup; stroking the cat; letter of marque) – you get to do another lot as part of the trial!
For the trial, choose the options BBABAAA:
100 dollars – B/middle icon – island with single palm tree
200 dollars – B/middle icon – pie chart with three arrows coming from it
300 dollars – A/first icon – a picture of Mercy from Overwatch
400 dollars – B/middle icon – a punk girl walking the plank
500 dollars – A/first icon – a boy band – the Jonas Brothers
600 dollars – A/first icon – a pirate taking a nap on a couch
700 dollars – A/first icon – man with white light bathing his screaming face
You then win the Language Trial.
Pirate Drinking Trial
For this trial to activate, you first have to go ‘back to shore’ (the Beach): To do this, TALK to Jolly Jim the Ferryman (Docks Room) and present him with your ‘3 pieces of gold’ – i.e, two coins and the gold tooth.
Remember to light them up with candle+matches first. He then agrees to take you back to the Beach on the ferry boat.
Now exit right over the quicksand, up the centre path, exit right again at the Buddhist’s Cave, and finally enter the 2nd door on the right to the Wool Shop.
TALK to Jeremy the proprietor, and get the Craft Beer.
Next, go to Dark Seeds, TALK to the clerk, who is now a Japanese girl, and ask to buy some seeds. Buy all the seeds available (tomato, sunflower, pumpkin, belladonna, black rose), which uses the Bag of Nickels to pay for them. Return to the Beach, and go to the Statue Beach. Plant the seeds you just bought in the Fertile Soil as well as the broken bulb from HoF’s Trailer. USE the Cola with the Tomato Plant ‘pile of dirt’, (*after* you’ve planted the Tomato and other seeds in Present Time); then go into the Future (push the lever to the right) to get Tomato Sauce (white sugar + tomatoes + time = sauce). Pick up the Tomato Sauce.
You can now get a raw red Tomato by going back to the present (lever to the left), and then again into the future (lever to the right), and grabbing it off the Tomato Bush.
Get sliced tomato by USEing the Knife on the Tomato.
GET the Pumpkin, then USE the Knife on the Pumpkin, to cut the Mature Seeds out. Next, the Prawns. Go to the present (lever to the left).
Get the Bucket o’ Prawns (from Slackluster’s Dumpster); go to the future (lever to the right), if they haven’t yet turned into Old Prawns.
You, of course, still have the living ones in your inventory (as the Bucket O’ Prawns from the Slackluster’s Kitchen), which simply stay the same, future or present (because of preservatives).
Finally, GET some flowers: Black Rose and Sunflower.
Move the lever to the left (present) and collect a Fresh Lemon from the tree. Move the lever to right (future) - now, the tree has Rotten Lemons on the ground; get one of these. Move the lever to the left again (present).
Return to the Pirate Bay (Jim has parked his Ferry near the Beach, so USE it to go back), and go into the Ancient Mariner tavern once again.
Ask a pirate if you can do the Drinking Trial.
Nb. For an easier time, go back to the Pirate Cave where the Alien is, and check your Cookbook again; Julius recognises some drink recipes, and so now when you do the Drink Trial, several of the correct ingredients will come up as Blue.
1. First, choose the Craft Beer and mix it with Mature Pumpkin Seeds (turning the beer orange); then add in just Old Prawns, Black Rose, and Tomato Sauce – NOTHING ELSE.
2. You have now made spirits, and as you drink it, you pass out and suddenly wake up again on the Beach, as though the game had restarted. You need to try again, and have someone – or something - take the drink for you instead… How to do this?
Go to the Smokey Mountains Village.
You need a ‘puppet’ which you can use to ‘drink’ the spirits for you.
Here’s how...
1. Go to the Wool Shop; get Orange Wool, and Blue Buttons. Exit the Wool Shop; go up, first door on the right, and get the Chisel and the Fuel Can from the Blacksmiths.
Return to the Cave; then to the Farmer; exit right to the Crossroads; Enter the Southern Village via the path going downwards; finally, visit the Den of Antiquity at the top-centre of the room. The Den Clerk is outside smoking.
Go inside, and get the Jar of Iridescent Buttons, some Solder on the shelf behind where the Den Clerk stands, and Coffee Filters. Finally, combine the Rotten Lemon and the Flask to make ‘alcohol’ (or, extremely bitter gin/poison).
To get the Toaster is more difficult. The Den Clerk keeps walking in to get his coffee, and tells you not to touch the Toaster just as you’re getting it. Exchange his Green Cup of Coffee for the Blue Cup - the cold, mouldy contents of the Blue Cup makes him sick, he leaves, and you can get the Toaster.
2. Return to the Smokey Mountains, and go bottom-left to the Puppet Master. TALK to the Puppet Master, and ask him if he’ll make a ‘toy’ puppet for you; he wants some coins for this, but his insanity is so developed that he’ll also accept Blue Buttons as coins.
As a result, you get back a Toy Puppet, but you will have to wait 10 minutes for this to happen, so keep asking until you get it.
Return to the ‘Ancient Mariner’ Tavern; try the drinking trial, and this time, the toy puppet will drink for you; you now survive, but the pirates see through the toy puppet, and Old Jack shouts ‘No cheatin!’
Go back and TALK to the Puppet Master, and while there, get him to add the Orange Wool to the puppet (to simulate Julius’s red hair) . Next, see if you can’t make it more realistically like you/Julius, and add his patent green jacket. Ask the Puppet Master about this – he says he will need a jacket swatch from you.
3. Go to HoF’s trailer, and with him unconscious, USE the Silver Scissors to cut off a small black Jacket Swatch out of black fabric on his backside.
Next, go to the Beach, put the black Jacket Swatch on the beach, just at the edge of the waves. Exit right to the Statue Beach, and go into the future (lever to the right); return to the beach, and find that the swatch is now a greeny-white-faded Jacket Swatch.
Pick it up, then change time back to the present, and return to the Puppet Master.
Give him the Whitened Swatch, and pay for the puppet with the Jar of Iridescent Buttons.
The puppet’s done in 5 minutes.
You now get the Puppet with hair and clothes like yours , BUT the pirates still see through it.
4. Go back and ask the Puppet Master if he can give the Toy Puppet your face. He asks you for various things. Give him the Chisel, Flask, and the Toaster, and he’ll start making it. Return after ~2 minutes; you should now receive the complete Toy Puppet.
With this puppet, you’ll convince the pirates that you’ve completed the drinking trial.
Congratulations – you’ve now won all 3 trials! You receive a Shoe for your troubles (it’s better than nothing).
LOOK at the Toy Puppet ; you’ll find that the spirits it drank are actually Car Coolant (car item #5).
Return to the Smokey Mountains; once there, go to the Library (third door, righthand side). Talk to the Library Master and learn how to find a particular book.
Learn the Rune Language, by getting a book ‘My First Rune’ from the Library shelf on the left.
The librarian in the Library is a nerd with a cowl; he will give you his bobblehead (brown skirt) if you answer 12 questions. The answers to most are automatic; but 4 of them require investigation:
The answers to these can be gleaned from the following:
1 Reading (ie. LOOKing at) ‘The Life of the Monarch Butterfly’ in the Library (search each book on the bookshelf by LOOKing and clicking).
2 Reading (ie. LOOKing at) ‘Everyone Hates Richard’ in the Library (search each book on the bookshelf by LOOKing and clicking).
3 Return to the Buddhist’s Cave; learn the three cow emotions by shining matches+candlelight on the blank area of the wall to the left; you will see a hidden message there (and, since you now know Runes, you can translate and understand it). Continue to the Library.
4 Translating the Old Runes Book since you now read runes from the My First Runes book – but it’s still unfamiliar.
To achieve translation of the book, do the following:
a. Got Dark Seeds; ask the Japanese clerk to translate the book for you (she’s an Master of Linguistics)
b. Return to the Beach; get the CD Player from the car, by questioning Doc Braun.
c. Julius will drop in the Relaxation CD.
d. Go to Dark Seeds (east/right at the Crossroads). The attendant is a Japanese Clerk. Give her the CD Player to help her translate the book, and in 4 minutes she’s translated it (without the CD it would have taken an infinite amount of time).
e. Get the book; it’s not Runes, it’s Greek. The colour of the ocean Homer describe is actually ‘wine-dark’ or red. Hmm, fascinating if a little extraneous.
TALK again to the Librarian, and try to answer the various questions, and keep returning to the list until you have answered all 12 successfully.
You will then win the 2nd bobblehead.
Now, combine both bobbleheads (brown-skirt from Library and green-skirt from Den of Antiquity) into one: USE the Knife to flip off the 1st doll’s head, creating a headless doll; then the 2nd doll’s head. Combine both to get purple haired head with green skirt.
Now it’s a perfect ‘Katy Perry’ bobblehead (car Item #12).
Return briefly to the Haunted Mansion in the East Village. Go in and walk up the stairs. Using your matches+candle; you will see a character – a large, floating, Pirate Ghost with one shoe, lit up at the top-left of the screen; while illuminated, give him the Shoe (i.e, USE the Shoe on the Pirate Ghost). His missing shoe returned, he slowly disappears into the sky. He leaves you a Skull Key in return, which you take automatically.
Mainframe
Finding the stairs the Pirate Ghost used to float above are now repaired, you can go up the staircase to the left of the screen. You enter a room with a large IBM-like Mainframe, connected to a plug in the wall. TALK to it; you learn the Cow Island, and all the people and animals on it, were his creation, and he’s been running it with magical, reality-bending powers for the past 1,000 years. You ask him questions and learn that he’s far more advanced than humans, and plays with their fortunes for a laugh. He offers you a magic wish to get off the island and back to the time you started in; though you don’t know whether to trust him. He magics into existence two doors on either side of the room. You now have 3 endings to choose from, and can’t leave the room until you do:
Left Door: You go through the door, and are instantly transported to the bottom of the ocean. It turns out, Julius can’t swim. Credits, the end.
Right Door: You go through the door, and are transported to some quadrant of space, freezing and suffocating in seconds. Credits, the end.
Unplug Mainframe: You unplug the mainframe from the wall; he shuts down in seconds, and both him and the doors disappear. You are left with a Glowing Green Rod.
Take it, and combine Chewing Gum with it to be usable in the car.
After unplugging the Mainframe, all characters (except Doc Braun) disappear from their rooms; you walk through a land devoid of life.
Go to the Cave inside the Beach, and drop the Skull Key into the water (i.e, USE the key on the water). Now, go to the Statue Beach, and flip the switch to the left (into the future). Walk back to the cave; get the Car Keys (car Item #1) from the dry lake-bed, then go to the Statue Beach and flip the lever back to the right (the present). (The 18th century key from the dead pirate is jetted forward X hundred years, and becomes a car-key; extraneous I know, but this is a pretty absurd adventure game).
Return to the Beach Cave, give the Complete Bobblehead to Doc Braun, and also give him all the other ingredients in your inventory (car keys, flow inductor, circuit board, etc.), and let the top-left icons light up one by one, until Doc Braun says ‘Its fixed!’
You are met with the credits; good job, you’ve finished. :)


13 Comments
Want to join the discussion? Leave a comment as guest, sign in or register in our forums.
I am confuse when walkthrough tells the following: "find the Silver Scissors in the kitchen drawer (in the same cabinet as the sink)." Which cabinet? I am using light candle and sure cannot locate that key. Also dishwashing was on floor and not at right of sink
Reply
That’s a mistake in walkthru from an early version of the game. The scissorscan be found in the centre of the counter only when the candlelight is lit.
Reply
Thanks, Ben! I've updated the walkthrough accordingly.
Ok but last time, I noted that key was center bottom left but was not quick to pick up. I did tried locating it at center count but not there. It might help providing screenshot locating that.
Yaaaay! Found them. Thanks. Next problemis how do I get past level 1 on the video game. Everytime I press P to replay I'm still on level 1.
Ok, I found that silver key
I can't find them either. Help!
Reply
Question: good hints for the 12 questions of the librarian, but: the question for his name - he keeps saying no, in spite of having clicked/read all books. What makes him accept it?
Reply
What makes the librarian accept the answer for his name? He keeps saying no
Reply
Based on walkthrough and ordering sandwhich for first time, does mention any fillings we like but it seem we need paying with small coins in which I don't have. Something I missing here?
Reply
I noted on part two of walkthrough mentions lightbulb but fails to mention where to get. That thing is found inside of house of fury around mirror and the broken one is the one you need
Reply
walkthtrough mention getting coffee filter in Den of Antiquity part 3 It is nowhere to be seen, can anyone had same problem? Will be good to know where it is exactly
Reply
Yea I just completed this difficult game. Those who have trouble locating coffee filter inside Den of Antiquity, it is amount associated junk and that thing is amount keywords, simply point until you find it. I'll be more than glad to provide assistance if I can
Reply
Leave a comment