Elroy and the Aliens walkthrough

- 1 Comment
Walkthrough by Motiviti
The following is a path of necessary steps to complete the game, but there is much more to see and do in Elroy and the Aliens, so players are encouraged to take their time and explore!
City
Wake up
Use Door
Pick up Keys
Use Keys on Door
Peggie dialog
Pick up Propulsion module
Pick up Newspaper
Pick up Remote control
Pick up Haani Pentagon book
Use Toilet door
Pick up Broom
Go to Rooftop
Pick up Guidance module
Pick up Fuel canister
Pick up Spout
Combine Spout and Fuel canister
Use Propulsion module on Fuel module
Use Guidance module on Rocket
Use Fuel canister on Rocket
Use Remote control on rocket
Peggie interview (choose any options)
First launch fail cutscene
Go to Sierras Scrapheap gate
Pick up Tire
Use Pulley (solve puzzle by rotating pulley)
Use Tire on Hook
Use Hook
Use Lever
Go to Scrapheap
Pick up Old purse
Pick up Bucket
Go to Scrapheap Shed
Pick up Hose
Talk to Sierra (select dialog option 1: circuit board received)
Go to Elroy's Rooftop
Use Circuit board on Rocket
Crow gets in the way
Go to Lab in Elroy's home
Use Fireplace
Use Newspaper on Fireplace
Go to Street of Elroy's home
Talk to Mrs. Kandinsky (select dialog options 3, 1: matches received)
Go to Lab in Elroy's home
Use Matches on Fireplace
Go to Elroy's Rooftop
Crow get smoked out
Use Remoteon Rocket
Second launch cutscene, Elroy falls down to Street
Dialog with Peggie & Mrs. Kandinsky.
Go to Elroy's Rooftop
Check rocket
Dialog with Peggie
Go to Elroy's Rooftop
Use Crashed Rocket
Pulling out cutscene, box revealed
Go to Lab in Elroy's home
Use Broom on Hole
Use Mysterious box button
Diego’s message cutscene and Peggie dialog
Leave Elroy’s Home (Mrs. Kardinsky dialog, choose any options)
Go to Peggie's office
Dialog about Diego’s message
Click on fuel stain/coordinate in book
Click through all computer articles
Peggie dialog – making plan (Elroy gets coordinates, Peggie finds a way to get the crystal)
Go to Theater park (town square)
Talk to Charlie (go through all dialog options, player has to get his tinfoil hat back)
Combine purse and pencils = purse with pencils
Go to train station inside, witness Security Robot destroying unattended luggage
Talk to ticket teller (all options, he shuts the window at some point)
Use Purse with pencils on Floor
Walk towards the exit and wait for Security Robot to come out
Talk to Security Robot (select dialogue option 2: purse destroyed)
Pick up Diamond
Go to Train tracks
Talk to Conductor (go through all options)
Walk back, talk to Stan Rosebud, homeless person, after he calls you over. Go through all dialog options until you get the name ‘Losantos.’
Pick up Spray can on floor
Go to Train station outside
Talk to Bridget (talk to her until you give her the name Losantos and she looks it up in her book)
Got first location clue (circle on map)
Go to Basketball Court
Talk to Terri (talk to her and learn that she has Charlie’s tin foil hat and wants a crown to replace it)
Go to Lab in Elroy's Home
Use Diamond on Laser Cutter
Use Bucket on Laser Cutter (Crown received)
Combine Color Spray and Bucket Crown = Painted Bucket Crown
Go to Basketball Court (playground)
Talk to "Queen" Terri (go through all options)
Use Painted bucket crown on "Queen" Terri. We trade crown for tinfoil hat.
Go to Theater park (town square)
Talk to Charlie. Give him tin foil hat, go through all options to get disk and compass from him
Pick up space blanket
Go to Sierra’s shed
Talk to Sierra (tell her about what happened, go through all options)
Use Charlie’s Disk on Sierra. She tells you to fix the generator
Go to Tower
Use Hose on Car Fuel Tank
Use empty fuel canister on Car Fuel Tank. (Fuel received)
Go to Sierra’s Scrapheap
Use Fuel on Generator
Use Space blanket on Cooling tank. (Generator fixed)
Go to Sierra’s shed
Talk to Sierra (select all options until we get disk data. New circle marked on map. We now have the location)
Go to Peggie’s office
Talk to Peggie (go through all options)
Go to Perry St.
Talk to Mrs Kandinsky about the crystal
Go to Peggie’s Office
Talk to Peggie about the location of the crystal
Now playing as Peggie. We need to get the Crystal from Wanderbrust’s office
Go to Tower lobby
Talk to Joe Biggs (select all options)
Go to Elevator
Press floor ‘W’
At floor 13 we get a cutscene of a time rift anomaly. Go back in the elevator afterwards. Press ‘W’ floor
Talk to secretary (select all options. She won’t let us in unless Wanderbrust explicitly tells her)
Go to Peggie’s office
Talk to Elroy
Now playing as Elroy again. We need to record Wanderbrust's voice and edit it so we can fake him telling the secretary to let Peggie into his office
Go to Sierra’s shed
Use Voice recorder on radio
Go to Theater backstage
Talk to Albert (tell him you are Brandon Summers, go through all options. We need to make the rehearsal happen so we can use the audio station)
Go to Theater Powder room
Use One Last Time poster
Talk to artist (go through all options to get the red pencil)
Go to Theater Powder room
Pick up Alien Costume
Pick up Dress
Pick up Blonde Wig
Pick up Script
Go to Theater Storage room
Use Box
Pick up Robot Manual
Pick up Fake Blood
Use Robot (solve connections puzzle, solution found in robot manual) Robot wakes up.
Talk to robot (select all options until he moves to backstage)
Go to Backstage
Combine blonde wig and fake blood = red wig
Use red wig on robot head
Use dress on robot
Use red pencil on robot
Talk to robot. Tell him to move to stage.
Go to Stage
Talk to Director (go through all options)
Use Button (left) 2x, until portal scenery comes up
Use Button (right) 3x, until rocket scenery comes up
Talk to Director. Begin rehearsal. Select options in following order:
- Oh, dear Victoria. What is it that gave these trees a voice...
- I have seen a thousand worlds. I have traveled the stars far and wide.
- I never expected to love a human.
- Victoria ... your father…
- The portal on Earth is gone. I cannot go back. Not by wormhole.
- Wait! If I steal my father’s ship…
- My love…
- One last time, we’ll lay down today.
Rehearsal finished
Go to Theater backstage
Talk to Albert (go through options until we can use the mixing station)
Use tape recorder on mixing station
Use the recorder interface to select and copy words from the top timeline to the bottom. We have to reorder recorded words to one of the following results:
- This is Wanderbrust. She can come in.
- She can come in. Wanderbrust here.
Use the record button to save the output to the tape
Go to Peggie's Office
Talk to Peggie (go through dialog until we switch back to Peggie)
Go to Secretary’s office once again
Pick up Mirror on desk
Use Mirror on window. We get inside Wanderbrust’s office after the cutscene.
Use desk, get note
Use Bookcase at ‘M’ section. Peggie finds crystal. Wanderbrust cutscene follows.
Go to Peggie's office
Talk to Elroy. After dialog, now playing as Elroy.
Go to Train station. Cutscene starts. Wanderbrust’s goons kidnap Elroy
Examine matches to light room
Use bag to pick up the Flowers, CD, Handcuffs and Boxers
Use bag again to take wrench. Open panel with wrench by unscrewing bolts. Unlock mechanism by moving both bolts from the middle. Trunk hatch opens. Elroy escapes and runs to meet Peggie at the station.
Train Ride
Cutscene. Elroy falls asleep and wakes up as kid: dream sequence.
Use Basketball hoop twice. Elroy throws ball. After a short conversation with his dad he is woken up by conductor.
We need to get past the conductor to find Peggie. Go left until you find Terry and her mom Sasha.
Talk to Sasha (go through all options until she mentions train brakes)
Talk to Terry (go through all options)
Use tape recorder on Terry. Elroy records proof of her being a naughty girl.
Talk to Terry again. Use the recording to force her to pull the brake.
Walk right, back to your seat. A cutscene starts and the train brakes violently. The conductor walks past Elroy.
Go right until we find Peggie talking to Stan. Short conversation follows.
Pull the brake or wait for Peggie to pull it
Desert Digsite
After we exit train, walk along the tracks to the right
Go to Town (map overview)
Go to diner outside then diner inside
Pick up Note
Pick up Shovel
Go to Tower
Use Middle cupboard
Pick up Audio Tape
Combine Tape recorder and audio tape
Examine tape recorder. We hear the recording of Jeremiah.
Go to Church outside then Church inside
Pick up priest's notes on floor. Examine notes to get fullscreen item. Click on ‘Jeremiah, aged 71’.
Examine bar notes. Click on names. Short dialog occurs. We now know the name of the deceased: Jeremiah Quentin Smith.
Use shovel on grave marked ‘J.Q.S.’ in the middle of the graveyard
Use the coffin
Use Jeremiah’s Pocket to reveal his notebook
Pick up Jeremiah’s Notebook
Go to Tower then Up
Use binoculars. Move right to find the butte depicted on Jeremiah’s map. Click the large butte that is to the right side of the derelict house.
Go back down the tower, click on the desert and proceed to walk into the desert.
A cutscene occurs. We reach the Haani Pentagon digsite
Go to Desert (Minefield Entrance)
Short dialog
Use Wobbly Sign (3x)
Pick up Iron Rod
Go to Base Camp
Use Iron Rod on Crate
Pick up Crate (Robot Head)
Go to Desert (Minefield Entrance)
Use Robot Head on Robot Body: puzzle opens. Connect wires to corresponding colors
New puzzle opens: we need to move connectors in a way that wires do not intersect, and all yellow marked holes are occupied

Robot wakes up. Go through all dialog options.
Use Path into minefield on the right
Talk to robot: ask about minefield. We get a countdown for self-destruct. Select any options. Peggie stops him before he explodes.
Talk to Robot, select minefield. Robot helps us to navigate the minefield
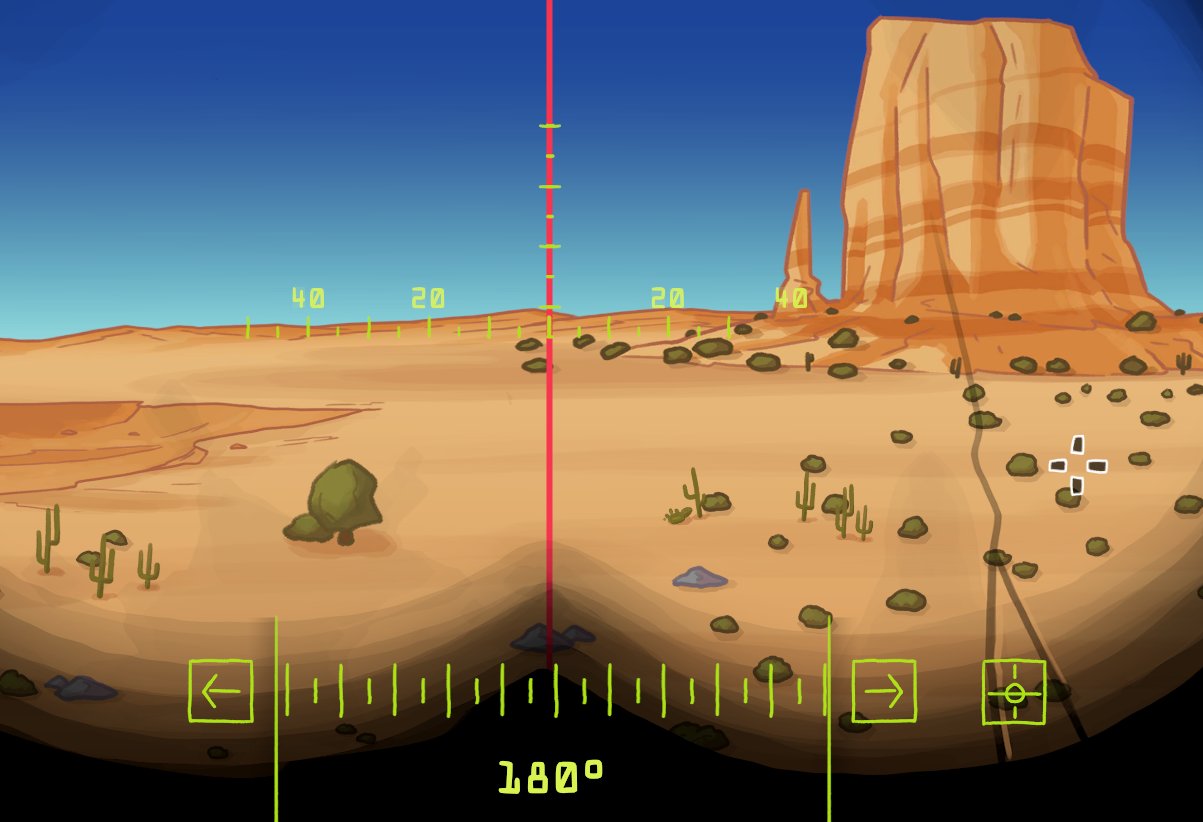
Entering Minefield. Solve by navigating the robot through the field and avoiding mines. Use this map to help you navigate. (Click to enlarge)

We arrive at digsite center, next to the Haani Pentagon
Pick up Tablet on floor
Go to Map then South Site (Terraces)
Pick up Tablet
Use Iron Rod on Crate
Pick up Soda
Pick up Bowl
Go to Map then East Site (Cactuses)
Use Table
Pick up Radio
Combine Soda and Bowl = bowl with soda
Use Bowl with Soda on Table (bees lured away)
Use Monolith
Use Crystal on Hole in center
Rotate circles so that light beams hit the correct light receptors and pass through the corresponding color crystal. Use the upper buttons to rotate, lower button to switch between circles (light beams are slightly bugged when solved)

We get a cutscene
Go to Map then NW Site (Boulders)
Pick up Tablet
Pick up Cloth
Use Boulders. Elroy and Peggie cannot move them by hand.
Go to Center
Talk to Robot. Ask him to follow you. We go back to Boulder site.
Talk to Robot. Tell him to self-destruct in order to remove boulders. We get a short cutscene.
Use Crystal on Monolith
Use Monolith and use Crystal on hole. Solve puzzle. We get a cutscene.
Go to Map then NE site (Spiral)
Combine Cloth and iron rod = cloth on rod
Use Cloth on rod on Oil stain on truck
Use Box and pick up battery
Pick up Wire
Pick up Tablet
Use Monolith and use Crystal on hole
Solve the monolith puzzle to get the next cutscene
Go to Map then South site (Well)
Combine Wire and Battery = WIred Battery
Use Wired battery on Solar station
Go to Map then Central Monolith
Talk to Howard and ask him for the artifacts that he found
Go to Map then South Site (Terraces)
Use Panel to take a closer look
Insert tablets in the following order Panel to expose monolith

(Tablet locations: minefield(2x), center, terraces, canopy, spiral)
Use Monolith. Use Crystal on hole. Solve puzzle to get next cutscene.
Go to Map then Well Site
Use Solar Station to get charged battery
Combine Torch and Matches = lit torch
Combine Radio and Battery = working radio
Use Well. Peggie lowers us into the well.
Inside the cave, walk right. Bats will scare us.
Use Radio on Bats
Use Radio. Select radio station that scares bats away.
Bats are scared away
Use Monolith, Use crystal on hole, solve puzzle to get final cutscene
Door in center area is now open
Go to center then Cave
Use Mysterious Cyllinder
Insert Crystal into hole. Portal lights up.
Use Note left of the portal. Puzzle opens. Solution:
- HIS EYES ARE LIGHTNING
- HIS ROAR IS A FLOOD
- HIS BREATH IS FIRE
Use Pillar. Rotate pillars into solution:

Cutscene starts. Elroy and Peggie escape through the portal
Cutscene from the past
Zarya /Fuxia
Arriving at the alien planet, Zarya
Stand on the unoccupied glowing platform
Watch the cutscene with the alien eye
Stand on the glowing platform to begin the test
The eye will propose questions. Answer them by standing on the platforms that correspond to the following symbols. After each answer, return to stand on the glowing platform.

After completing the test, the door to the right will open
Use Door
We enter a new room and a platform appears
Use Platform to ascend
Talk to both Guards. A Receptacle appears on the platform.
Use all items on Receptacle. At the end 5 Squishy Eyes are delivered. The door opens.
Pick up Squishy Eyes
Leave the room on the left
Talk to all aliens
Talk to Elroy and ask him for the Squishy Eyes
Use Squishy Eyes on panhandler 5 times.
Go to Cliff
Talk to talking rocks. Select options: LO, LO, TAKATA. A door in the tree will open.
Go to Tree
Talk to Professor Zax. Select all options. They both learn the alien language.
Now playing as Elroy
Go to Mountain then Downhill
Talk to Guard. Select all options until we can pass through.
Talk to Loiterer (tall guy on the right)
Elroy gets taken to “diyego”
Cutscene of Diego on an island. He found a crashed ship that he wants to use to get back to Earth.
Now playing as Diego
Move through the jungle to the right until we find the crashed ship
Talk to Zeke. Go through all options. Diego has to find insimbium to repair the ship. Collect 3 insimbium nodes with the nanitizer. Each time we need to solve a puzzle. Fill out all squares from the start, as seen on the image

After getting the insimbium, use helmet with it to collect. Take it to the 3D printer / A.S.S.P.™
Repeat this for all the insimbium ore on the island
At the end, we also need to get insimbium from Diego’s ship. Repeat the steps and bring it to the 3D printer / A.S.S.P.™
Cutscene at the end, we switch to Peggie in the tree with Zax
Go to Border/Wall
Talk to Guard. He opens the gate.
Go to Tavern square then Market square then Arena
Use Gate. Peggie finds out Elroy was taken and is being used as bait for Katanga.
Talk to Guard (go through all options)
Talk to Spectator (go through all options)
Go to Tavern Square
Talk to Journalist (go through all options and learn you need to complete a investigation into the Time disk theft)
Go to Tavern
Talk to Mikk about the Time Disk theft
Go to Gate
Talk to Stivven about the Time Disk theft
Go to Ancient Ruins
Talk to Slomek about the Time Disk Theft
Go to Brewery
Talk to Brewer about the Time Disk Theft
Go to Tavern Square
Talk to Journalist about the Time Disk Theft
Go to path to ancient ruins then Ancient ruins
Talk to Priest Slomek (go through all options, we get a sacred chant)
Go to back to Market square then Docks
Talk to Stipe (go through all options, Stipe will try to stop Diego from leaving the island)
Go to House on the right (Diego’s home)
Pick up Basket
Pick up Screwdriver
Pick up Machete
Go to Tavern square then Bar
Talk to Barman. We get an empty glass.
Talk to Beno. We need Fuxian ale to trade the glasses for.
Talk to Barman. Ask about Fuxian fire ale recipe.
Go to Docks then Up to ship
Talk to Dock worker. (go through all options, we borrow his tool)
Talk to Small dock worker (o through all options, we find out a flux compensator was stolen)
Go to Market Square then Brewery
Talk to Brewer (go through all options)
Use Wrench on Pipe
Use Squeaky Animal
Pick up Jug
Use Valve. Fullscreen puzzle opens. Rotate valve to open the flow.
Go to Ruins path
Use Basket on Red berries
Use Machete on Overgrowth
Use Cave. Solve puzzle.

Go to Cave then Cave hall to the right
Solve puzzles like the one before in order to get a platform that takes you to the next level
Pick up Key on the ground
Go to previous Cave corridor
Use Key on Keyhole
Use Hexiom. Solve last puzzle. Door opens.
Go to small cave room
Use Sqeaky animal on Squishy (animal)
Pick up Eggs
Go to Marker square then Back Alley
Pick up Mushrooms
Talk to Munarek (go through all options)
Use Basket with berries on Munarek. He paints us a portrait.
Go to Tavern Square
Talk to Journalist to give him the portrait to notarize
Go to Gate
Use peggie’s portrait on Stivven. We get stamp on portrait.
Go to Market square then arena entrance
Talk to Guard. Ask to enter the arena as a journalist. Peggie now enters the arena.
Go to volunteers
Talk to Elroy (go through options)
Go to Snails
Use Basket on Snail poop.
Go to Market Square
Talk to Merchant Zdenkka. Bring poop and Wonderian Eggs to Zdenkka and sell it to her. Buy flux compensator and Fire Spirit Catcher from Zdenkka. If necessary, repeat the Sheena sale until you have enough to purchase the items.
Go to Tavern
Use Squishy Eye on Jukebox
Switch twice to get calm song
Talk to Barman. Ask what song is playing.
Talk to Maclockly. Tell him to play a slow song so the fireflies fly down.
Use Firefly catcher on Fire spirits
Go to Brewery
Use Fire spirits onFurnace
Connect pipes like in image below

Use Empty glass on Drop
Combine Filled glass and mushroom = zaryan ale
Move right pipe from orange to green
Use Jug on Drop
Go to TavernSQ then Tavern
Talk to Beno. Give him fire ale in exchange for glasses.
Go to Mountain tree
Talk to Zax. Give him his glasses back. Ask him to translate the sacred chants.
Go to ancient ruins
Talk to Priest slomek. Show him the translated sacred chants.
Go to Arena then Snails then Spykor
Talk to Spykor. Go though all options. Tell him you can refill his tank. Put in the potent concoction.
Cutscene: Spykor’s snail eats his victim.
Go to Snails then Precious
Talk to Precious. GIve her sacred chants so she can calm her beast.
Go to Docks then Ship
Talk to Small dockworker
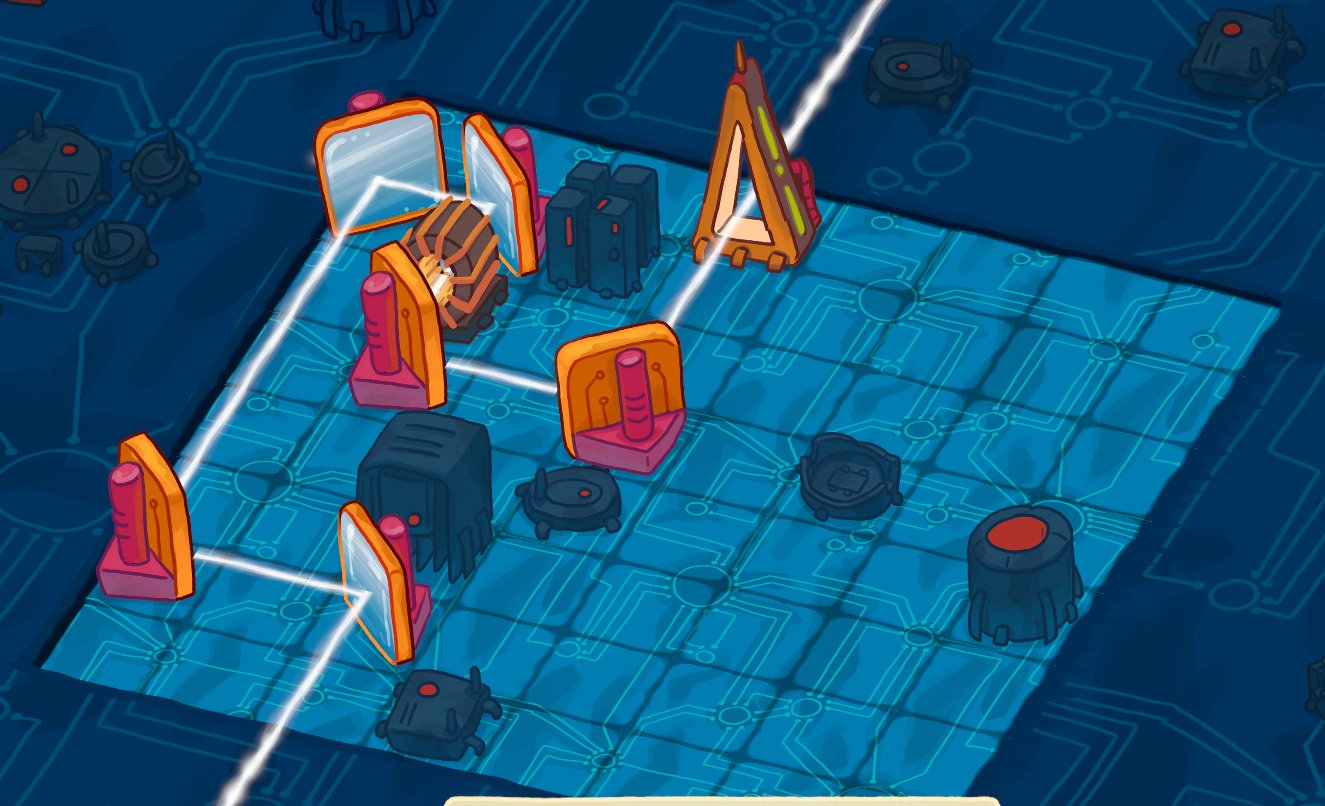
Give him the flux compensator. He asks us to solve a puzzle. Connect the light beams via mirrors to point to the receiver, via the gate. Example solution:
Cutscene of the ship leaving. Eggthor’s snail eats his victim.
Precious wins. Elroy is saved. More cutscene follow. Diego meets his son.
Go to Docks
Go to Diego’s House
Use Island Map
Cutscene showing Elroy, Diego and Peggie at the Ancient Ruins. Diego and Elroy go to the Portal Room.
Use Crystal on Pillar. Fullscreen puzzle opens and Diego asks the Guards for the combination for Earth.
Use Pillar and enter the solution:

Finale
Talk to Robot / Chauncey? Go through options. Tell robot to distract Little Joe:
- Father, Bessie…
- Amanda will help us take Bessie…
- Yes, we have to hurry!
Go to Tower then Stairs
Walk up the stairs. Some cutscenes follow in between the levels.
Enter Mayor’s office
Use Stuffed animal
Use Pane and enter in ‘ZARYA’
Go to Lab (Secret passage)
Finale cutscenes follow. At some point we get a dialog option. Depending on choice, we get an alternate ending.


1 Comment
Want to join the discussion? Leave a comment as guest, sign in or register in our forums.
Best walkthrough some things are updated now but most was correct
Reply
Leave a comment